

Added June 2023
Thoughts on model railway photography
 When I look at photos of model railways, I like to see a reasonably lifelike image, and there are three things in particular that I look for. One is the point of view (a near eye-
level view rather than top down) and the second is the depth of field (the overall focus of the image). The third is the use of a mid-range focal length (50mm on a full frame camera, or 38mm on a crop frame camera for example). This avoids perspective distortion from the use of wide angle or telephoto lenses. A fourth perhaps is lighting – especially avoiding conflicting shadows.
The notes below are applicable only to digital cameras.
When taking eye-level photos, it can be difficult to get enough of the image in focus. The closer the camera is to the object, the narrower the depth of field, so one option is to take the picture from further away (still using a standard focal length). More of the image will be in focus, but the object will be smaller, and hence the photo will need to be cropped to get the desired result. This may not be a problem if using a high resolution camera (24Mpx or more) and the photo is going to be posted on the web for example. (Using a telephoto lens from further away will not work, as it will distort the perspective and still give problems with depth field).
An alternative is to use a technique known as ‘focus stacking’. There are a few fundamentals to be observed:
- A series of identical photos is required, differing only in focusing distance. Between them all, every part of the object has to be in focus on at least one image.
- This implies that the camera must be able to operate in full manual mode, so that aperture, speed and ISO are fixed for the stack of images to give consistency throughout.
- To obtain identical images a tripod is essential.
- Good lighting is beneficial to give an even level of brightness across the whole image, preferably with no hard conflicting shadows.
- Software is required to convert the stack of images into a single composite photo.
A digital camera is obviously key. I use either a Canon 750D DSLR or Canon M50 mirrorless, both 24Mpx, with 22.3 x 14.9mm (crop frame) sensors. Both can be operated in full manual mode. A mid-range aperture is advisable f11- f14, ISO at 100, and speed at whatever is required to give adequate exposure using the camera’s inbuilt light metering. When taking photos using a tripod it’s best to use either a remote trigger (cable, Bluetooth etc), an app on a phone or tablet, or easiest of all, a 2 second time delay. With a DSLR it may be advisable to lock the mirror up to avoid camera shake when the shutter is released.
There are various ways in which the necessary stack of images can be obtained. There are many webpages which can be used to calculate the number of images and focus points required for given camera settings, and the desired finished depth of field. A simpler alternative is to take a series of photos, starting at the foreground, and adjusting the focus by increments of, say, 25 or 50mm each time (smaller increments for the foreground). This is a bit hit and miss, and just occasionally I have noticed some out-of-focus bits on the finished image. Twenty or more photos may be required for a depth of field on the finished image of anything up to 2m.
A third alternative if you have a camera with a touch screen, is to use the screen to focus on particular points, working from the foreground to the background. This ensures that the parts you want to be in focus are actually in focus.
A fourth alternative which I have not tried is to use a camera with in-built focus stacking capability.
When taking several stacks of multiple images, it’s worthwhile adding a ‘black’ image (with the lens cap on) between each set – it’s much easier to sort out where each set starts and ends when processing.
Having obtained the stack of images, all that remains is to load them into your chosen software, and let it do its magic. It can take a few minutes to process the stack, depending on the number of images, their size (Mpx) and the processing power of your computer. A free app is available for download called CombineZP but it is a bit clunky and not entirely intuitive. However, it is good and has the advantage of being free. (Search for CombineZM). There are many other applications which include focus stacking, such as Affinity Photo, Lightroom, Photoshop etc, dependent on the depth of your pocket. Affinity Photo is my choice.
The software typically goes through a number of stages, firstly aligning and resizing each image (since the field of view changes very slightly with a change of focusing distance) before identifying the sharpest parts of each exposure, and producing the finished composite image. The original stack of images remains unchanged, so it’s very straightforward for example to reprocess the stack, selecting only those images in the fore- and mid-ground, leaving out the more distant images so that the background is slightly out of focus on the final product.


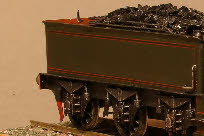
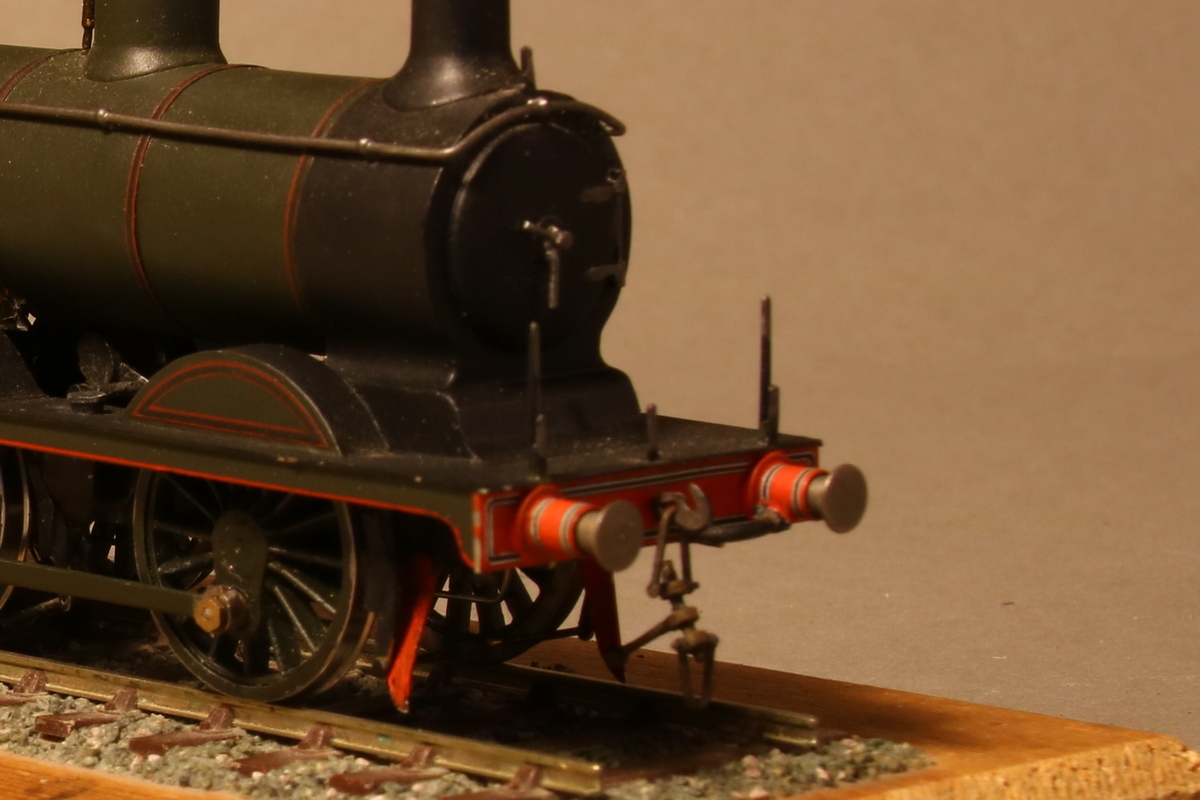
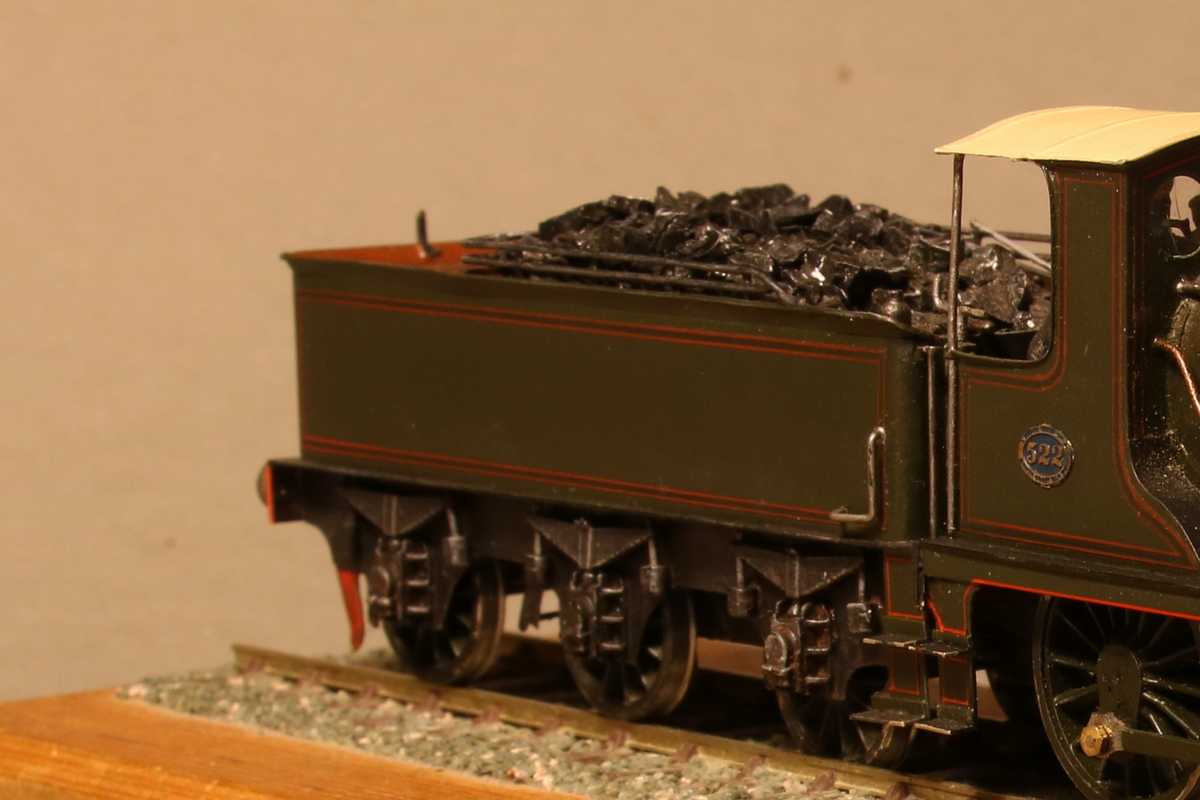
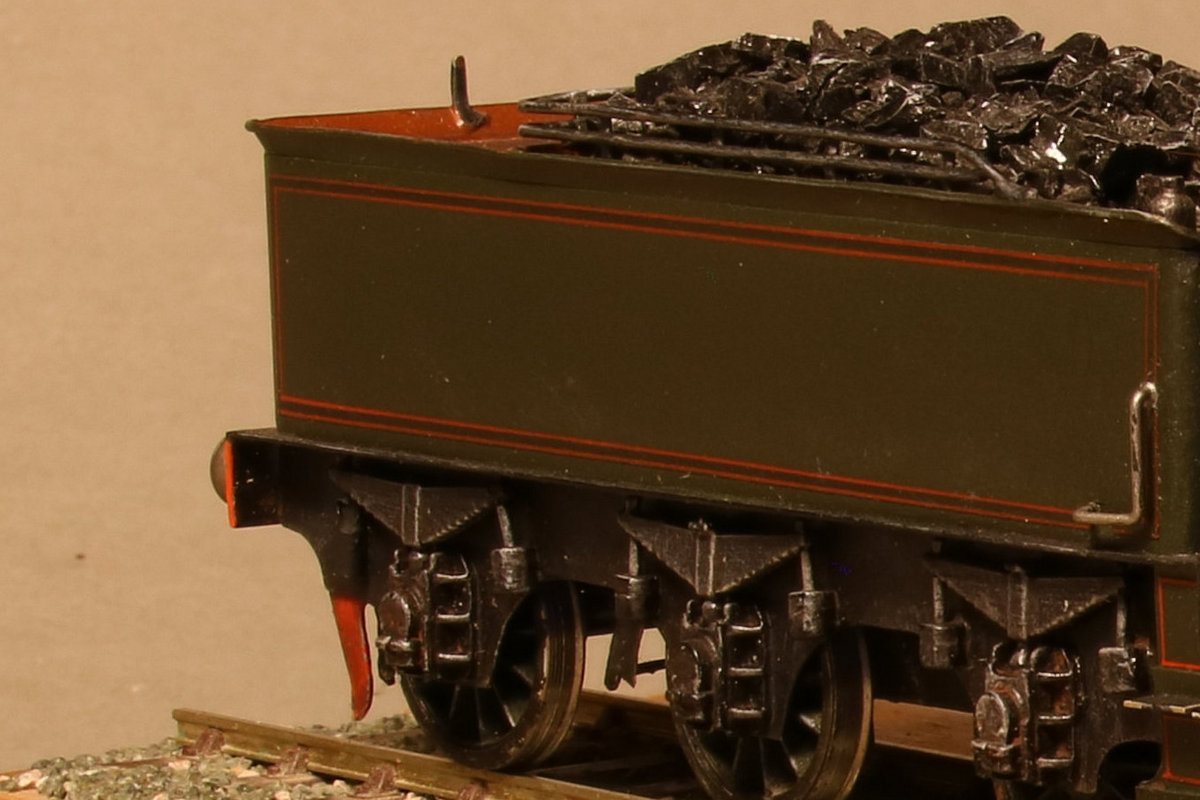
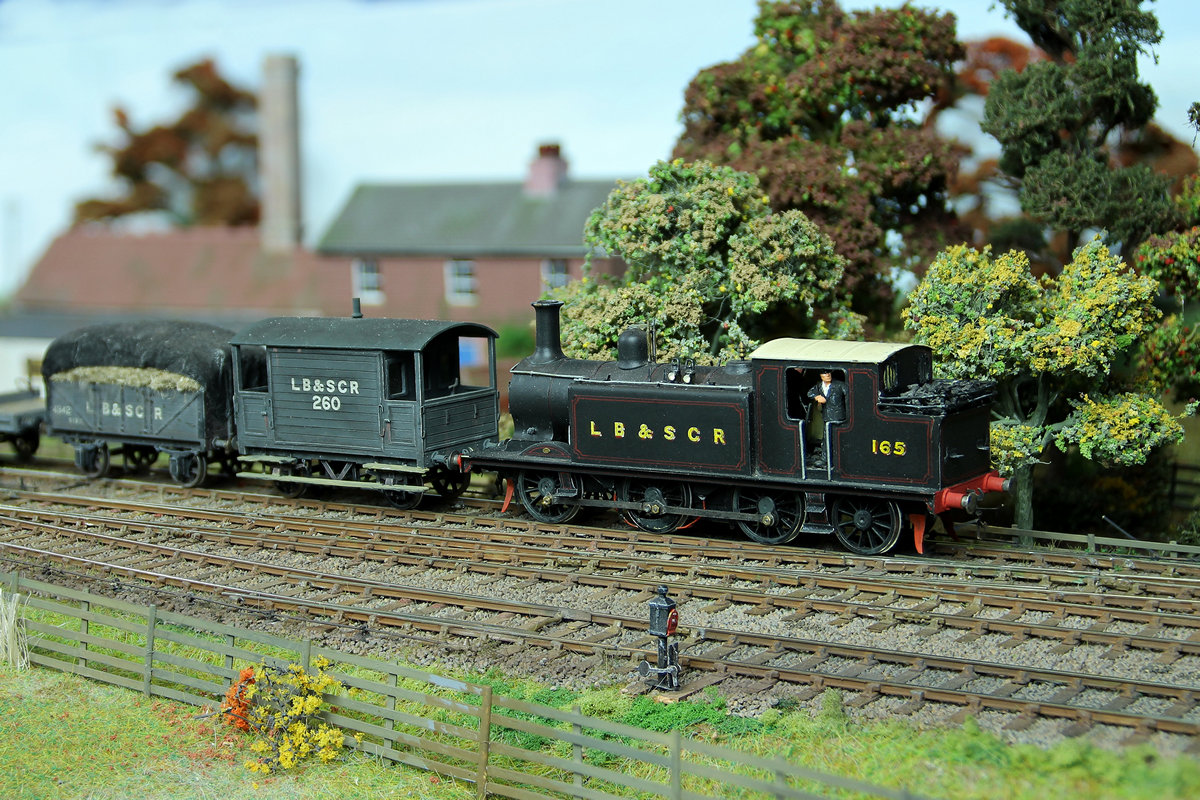
 The photo (left) is a single exposure, focussed on the cab front. The two enlargements (right) show the front and rear of the engine, and clearly not in sharp focus.

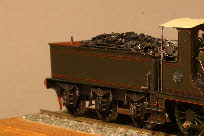
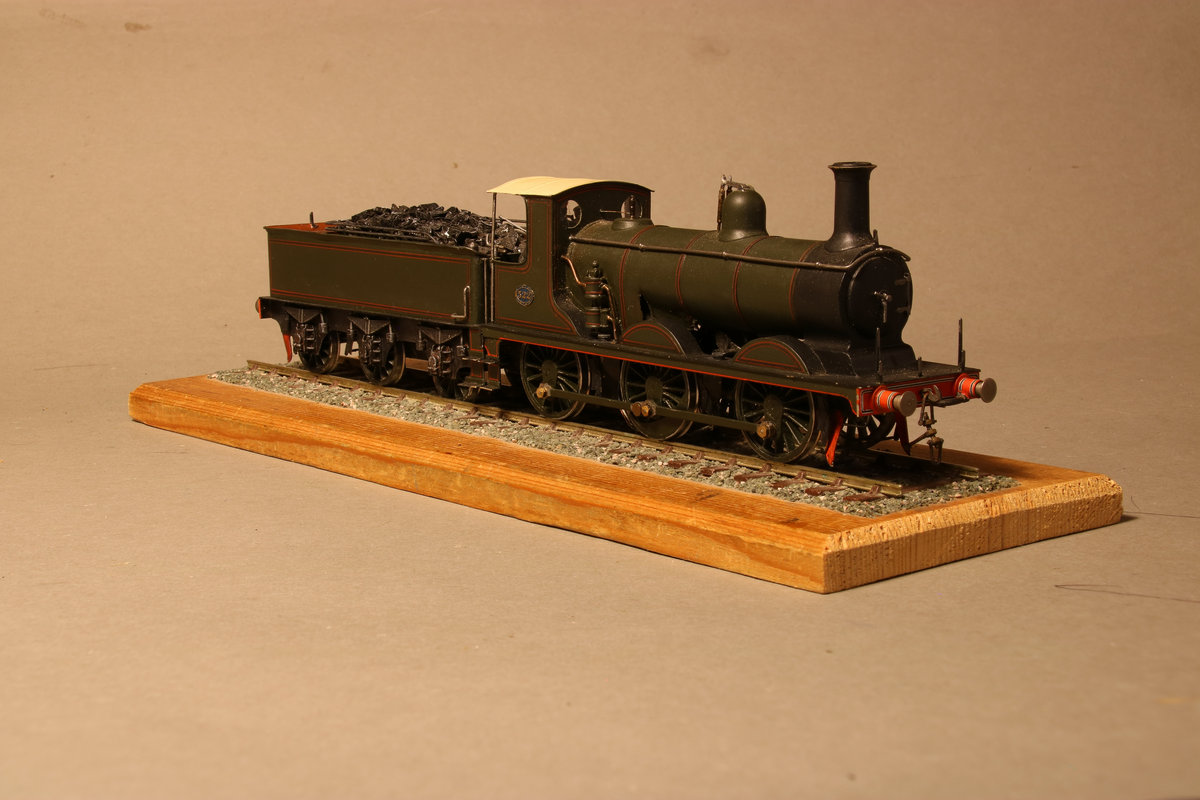
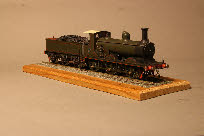 The photo (left) is a composite of 11 exposures, combined using the focus stack facility in Affinity Photo. The two enlargements (right) show the front and rear of the engine in clear focus.
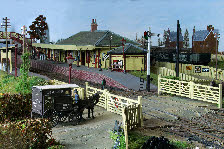
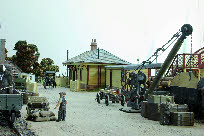 The photo (left) of Plumpton Green goods yard, shows the potential for ‘unlimited’ depth of filed using this technique.
Thoughts on model railway photography
 When I look at photos of model railways, I like to see a reasonably lifelike image, and there are three things in particular that I look for. One is the point of view (a near eye-
The notes below are applicable only to digital cameras.
When taking eye-
An alternative is to use a technique known as ‘focus stacking’. There are a few fundamentals to be observed:
-
A digital camera is obviously key. I use either a Canon 750D DSLR or Canon M50 mirrorless, both 24Mpx, with 22.3 x 14.9mm (crop frame) sensors. Both can be operated in full manual mode. A mid-
There are various ways in which the necessary stack of images can be obtained. There are many webpages which can be used to calculate the number of images and focus points required for given camera settings, and the desired finished depth of field. A simpler alternative is to take a series of photos, starting at the foreground, and adjusting the focus by increments of, say, 25 or 50mm each time (smaller increments for the foreground). This is a bit hit and miss, and just occasionally I have noticed some out-
A third alternative if you have a camera with a touch screen, is to use the screen to focus on particular points, working from the foreground to the background. This ensures that the parts you want to be in focus are actually in focus.
A fourth alternative which I have not tried is to use a camera with in-
When taking several stacks of multiple images, it’s worthwhile adding a ‘black’ image (with the lens cap on) between each set – it’s much easier to sort out where each set starts and ends when processing.
Having obtained the stack of images, all that remains is to load them into your chosen software, and let it do its magic. It can take a few minutes to process the stack, depending on the number of images, their size (Mpx) and the processing power of your computer. A free app is available for download called CombineZP but it is a bit clunky and not entirely intuitive. However, it is good and has the advantage of being free. (Search for CombineZM). There are many other applications which include focus stacking, such as Affinity Photo, Lightroom, Photoshop etc, dependent on the depth of your pocket. Affinity Photo is my choice.
The software typically goes through a number of stages, firstly aligning and resizing each image (since the field of view changes very slightly with a change of focusing distance) before identifying the sharpest parts of each exposure, and producing the finished composite image. The original stack of images remains unchanged, so it’s very straightforward for example to reprocess the stack, selecting only those images in the fore-

 The photo (left) is a single exposure, focussed on the cab front. The two enlargements (right) show the front and rear of the engine, and clearly not in sharp focus.
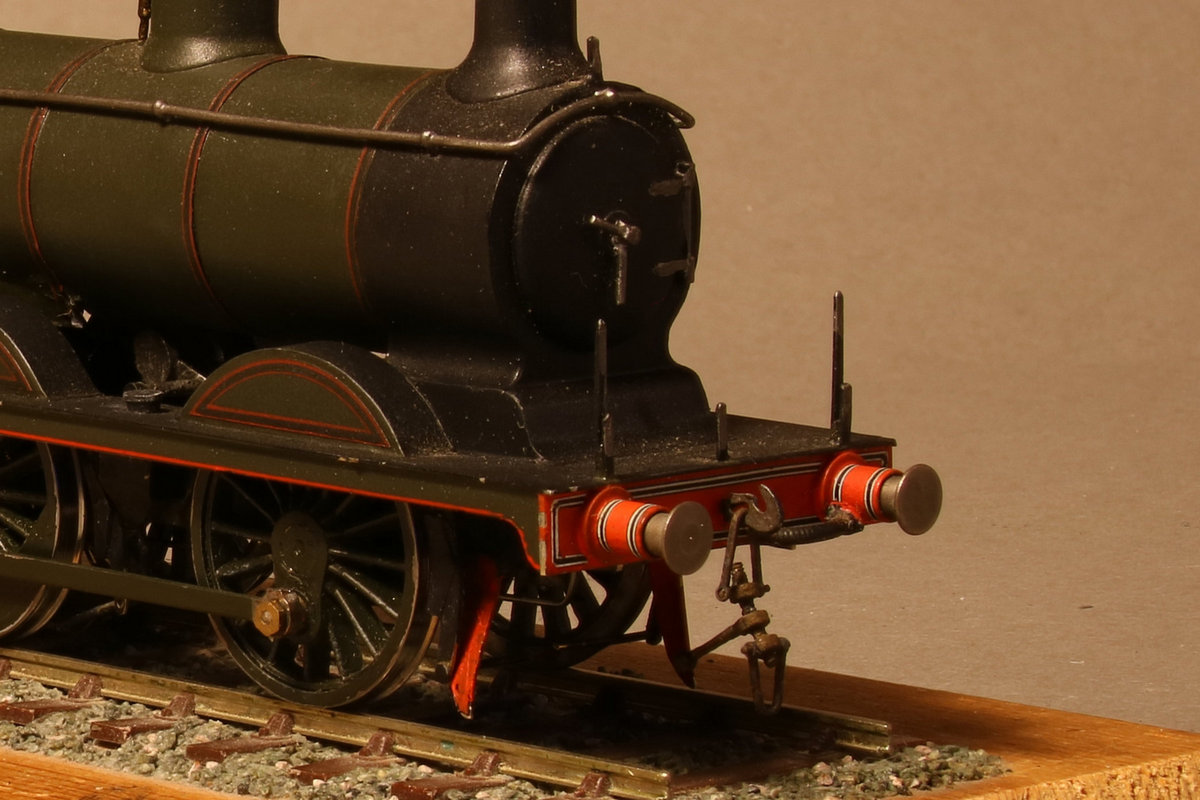
 The photo (left) is a composite of 11 exposures, combined using the focus stack facility in Affinity Photo. The two enlargements (right) show the front and rear of the engine in clear focus.
 The photo (left) of Plumpton Green goods yard, shows the potential for ‘unlimited’ depth of filed using this technique.
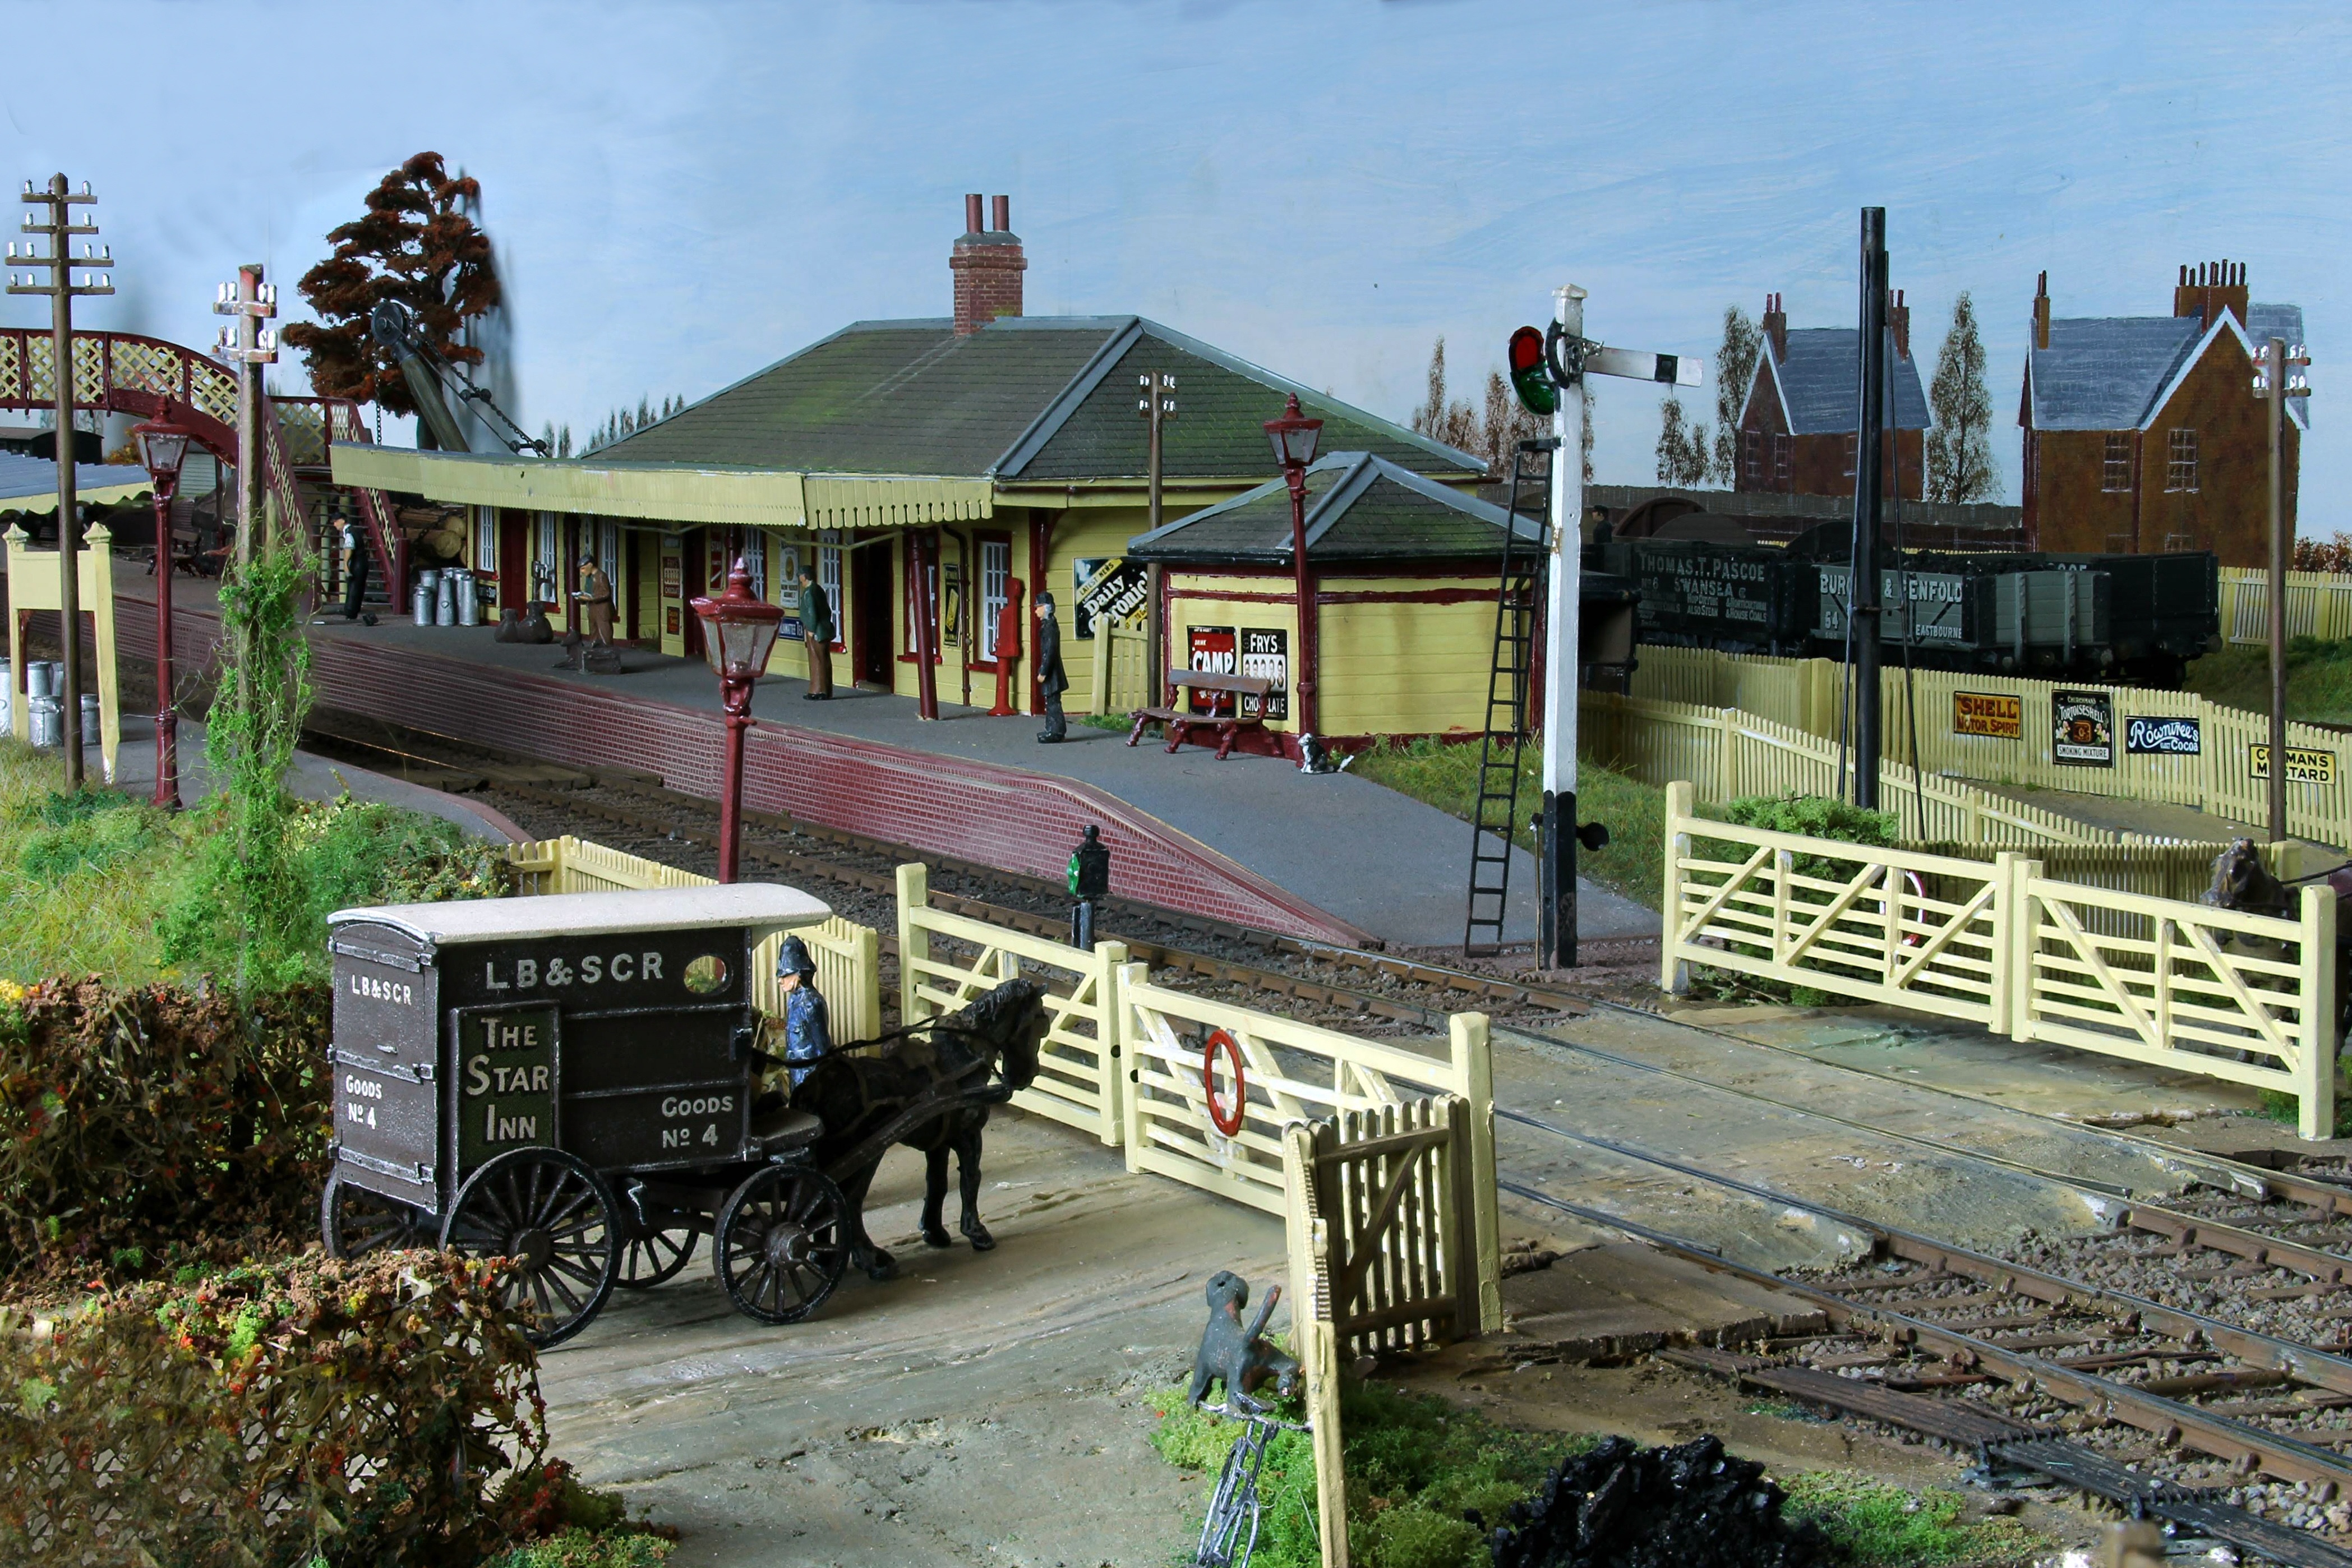
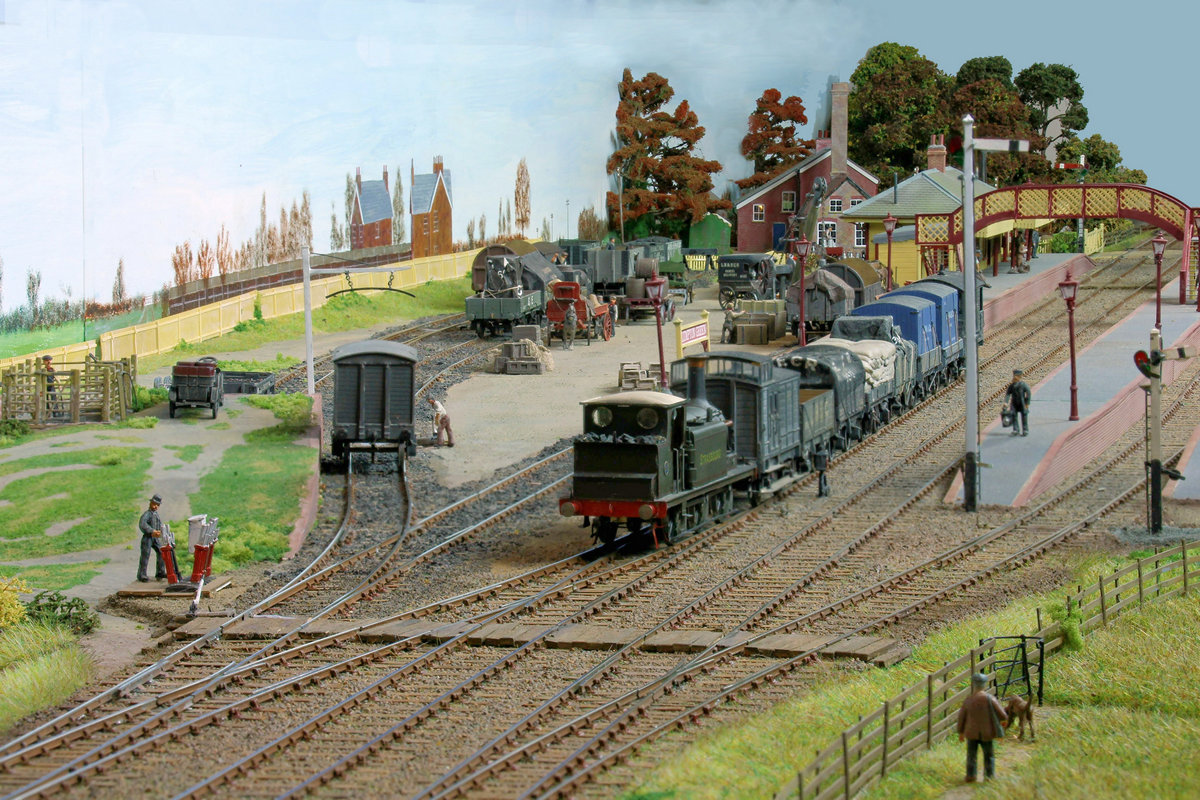 The photo (right) shows another focus-
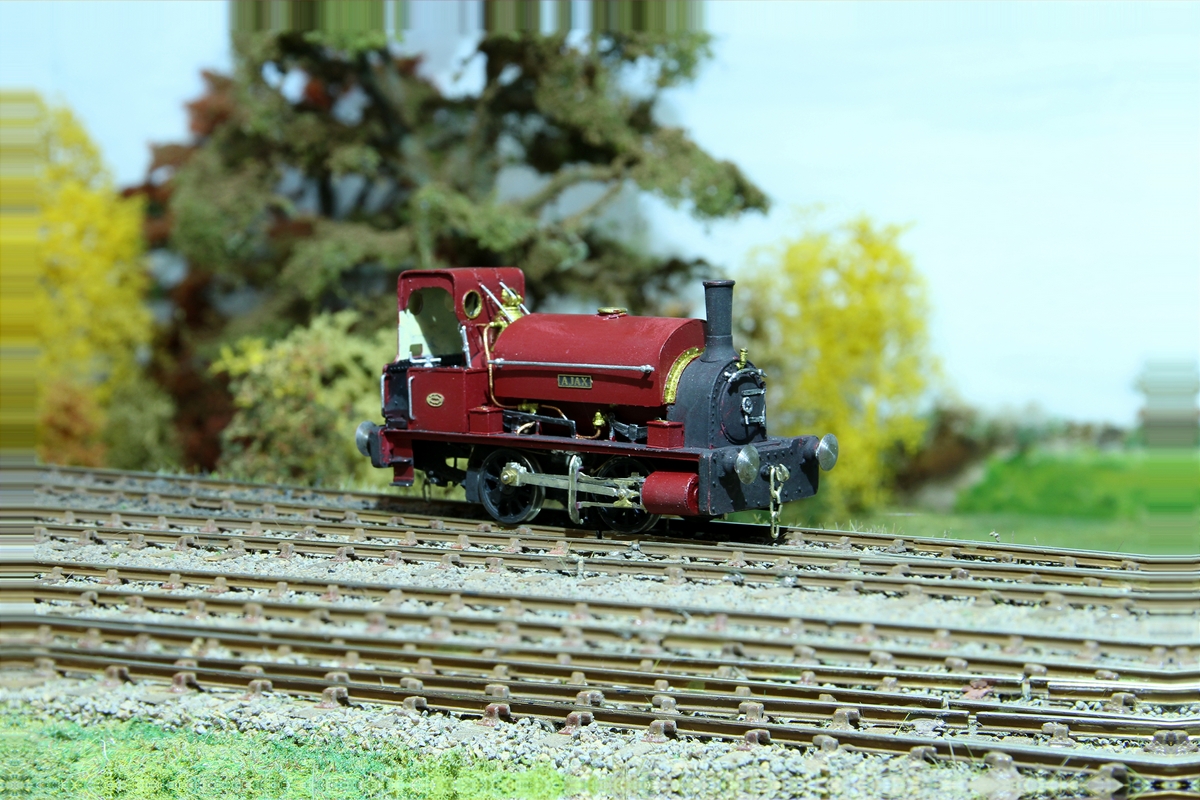
 Left -
Right -
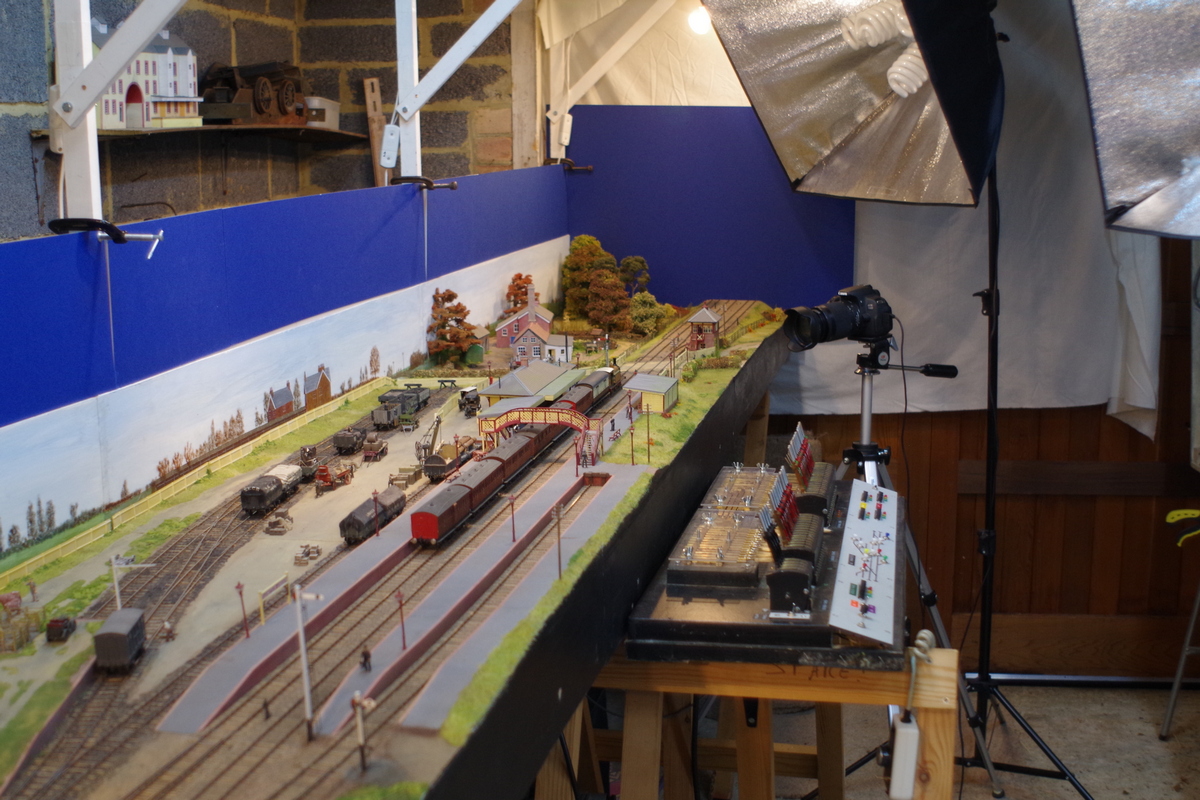
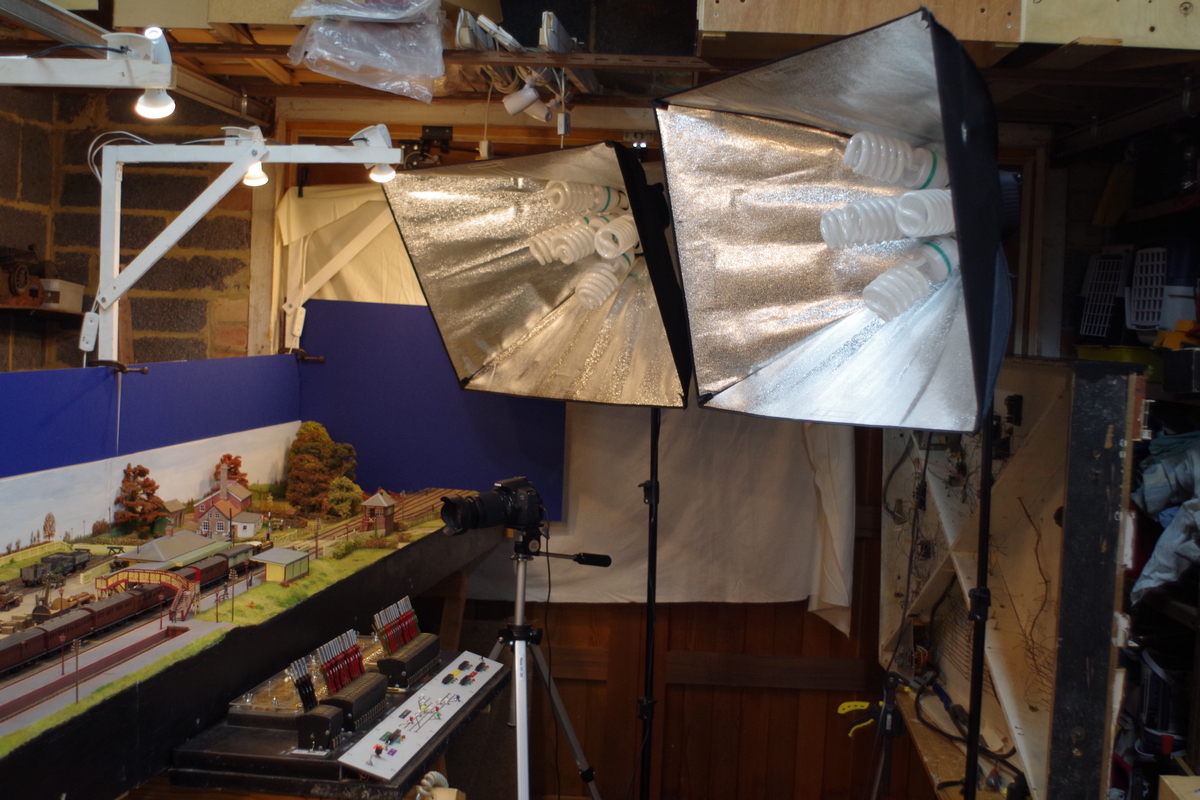 The photo (left) shows the lighting rig I use -